How to Add a WhatsApp Template in Practive
Practive allows you to create and manage WhatsApp message templates directly within the software. These templates can be used to send both automated and manual messages to your clients.
This guide explains the step-by-step process to add a WhatsApp template, along with important guidelines to ensure approval from Meta.
 The instructions are given below in numbered order.
Steps to Add a WhatsApp Template
-
Go to Settings > WhatsApp
-
Open the Message Templates tab.
-
Click + New (located next to the Message Templates heading).
-
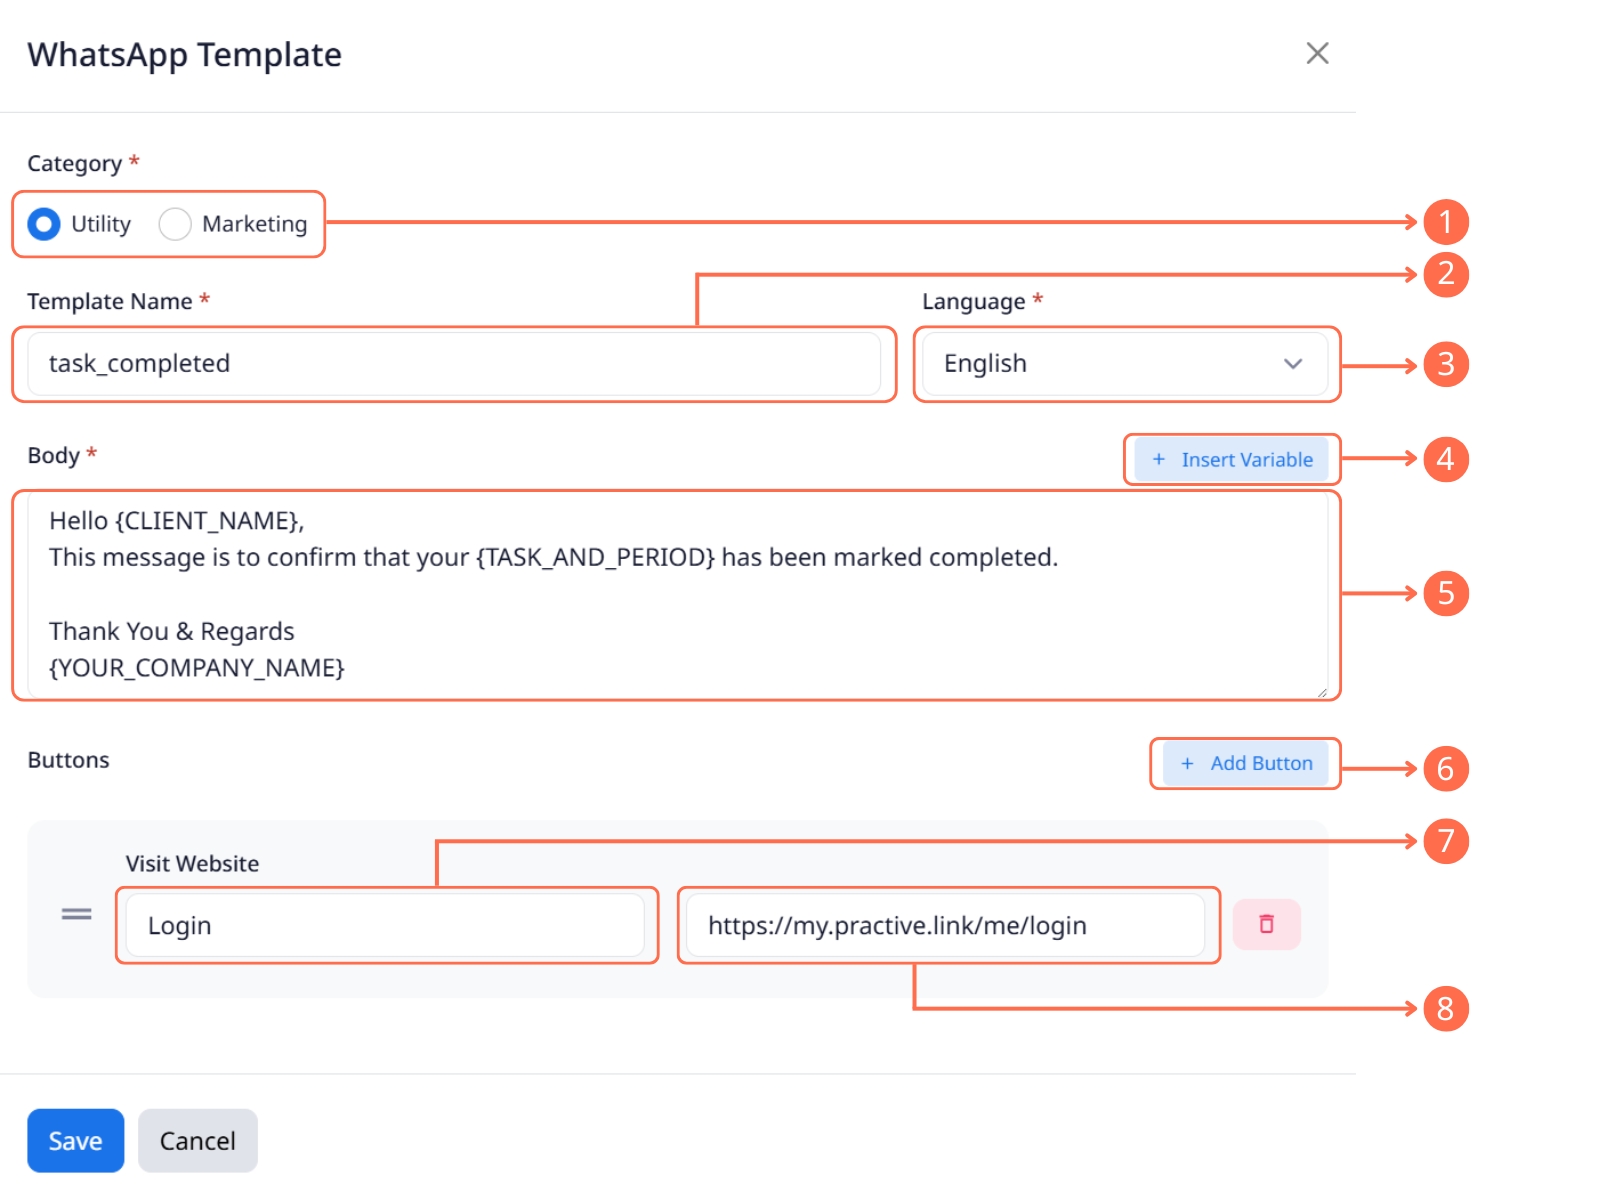
Fill in the template details:
Category – Select one:
-
Utility – For transactional or informational messages.
-
Marketing – For promotional or advertising content.
-
Template Name – Must be in lowercase and do not use spaces; use an underscore
_instead. (Example: task_reminder)-
Language – Choose the language from the dropdown list.
Insert Variables (Optional) –
-
Use the Insert Variable dropdown to add placeholders like
{CLIENT_NAME}. -
Variables will automatically be replaced with actual values when sending messages.
Example:{CLIENT_NAME}will be replaced with the client’s name.
-
Body: Compose the Message
a. Write your message in the selected language.
b. Include variables where needed.
c. Keep the message clear, grammatically correct, and respectful.Add a Button (Optional) – Click Add Button to include interactive options:
-
Quick Reply
-
Visit Website
-
Call Phone Number
-
-
Button Text – Enter the button label.
URL or Phone Number –
-
For Visit Website: Enter the website link.
-
For Call Phone Number: Enter the phone number.
-
Important Notes & Guidelines
Template Approval & Categories
-
After saving, template approval from Meta may take up to 48 hours, but sometimes it can take several days.
-
Meta may change the template category after approval.
-
Including links, phone numbers, or contact details may cause the template to be categorized as Marketing (which has higher charges).
-
Use clear and grammatically correct language.
-
Use a maximum of three variables in a single template.
-
Don’t place variables consecutively without any text in between.
Don’t place variables at the end of templates.
Editing Restrictions
-
Some templates cannot be edited once created.
-
Some templates may only be edited once or twice.
-
Avoid frequent edits, as they may affect approval and account health.
-
Create or edit only 2–3 templates per day.
-
Avoid repeated or back-to-back creation or editing attempts.
Related Articles
General Notifications Setting (SMS, WhatsApp and Email)
Go to Settings and open 'General Notifications'. Click on the notification name. Set the frequency, time, and day (if available). Click 'Enable' and choose your template for each SMS and WhatsApp message. Compose the Email as needed, using variables ...Manually Send Notification to Client (SMS, WhatsApp, and Email)
Open the Send Notification menu. Task Notification Enable the toggle if you want to show clients with created tasks only; otherwise, disable it. Select the service, period, and status as per your needs. Click on the 'Load Client' button. Select the ...WhatsApp Business API Setup
To integrate the WhatsApp Business API, please watch the video carefully and follow the instructions provided. Please ensure that the WhatsApp API number is not already registered on WhatsApp. Without entering payment details, the WhatsApp API will ...Task Notifications Setting
Go to Settings, and open “Task Notifications”. Click on “+New” button, and Select the Condition (Task, Status, Time and Days). Enable Notification types (SMS, WhatsApp, Email) and choose Template. Click on the Save button. Notification will be sent ...Add Expenses to Invoice
Go to the Invoice and click the +New button. Enter all details, including the client's name. Scroll down, you see a box. Click on the +Add Expenses button. A pop-up will open; select the expenses you want to add to the invoice. Enter the description, ...